
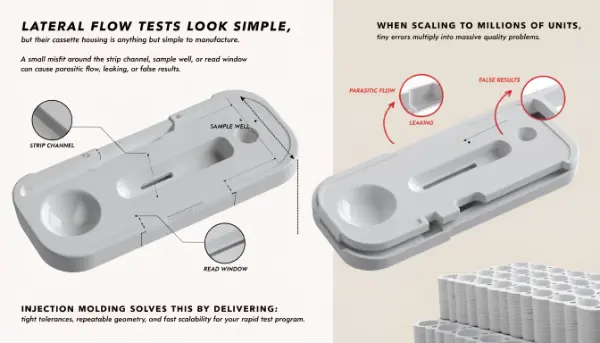
Lateral flow tests look simple. The cassette housing is anything but simple to manufacture. A small misfit around the strip channel, sample well, or read window can cause parasitic flow, leaking, or false results. When you scale to millions of units, tiny errors multiply into massive quality problems. Injection molding solves this by delivering tight tolerances, repeatable geometry, and fast scalability for your rapid test program.
Featured Answer
Injection molding for lateral flow test cassettes means matching the housing design to the assay strip, holding tight tolerances, and building molds that allow fast design changes. The best programs use early prototyping, insert-based tooling, and flow/warp analysis to reduce leakage, fit issues, and repeatability problems. Common materials include polypropylene, polystyrene, and ABS. A typical workflow starts with strip measurements, models the cassette around them, builds R&D tooling with interchangeable inserts, runs test builds, then freezes production tooling for high-cavitation, high-volume manufacturing.
I have seen cassette programs fail not because of a bad assay, but because of a bad housing. Let me walk you through what actually matters when you mold these parts.
Why Does Injection Molding Fit Lateral Flow Cassette Production?
You need consistency. Manual assembly and low-volume methods cannot hold the tolerances a lateral flow strip demands. When your assay is validated but your housing varies part to part, you lose test reliability. That is a real risk for any diagnostic company.
Featured Answer
Injection molding fits lateral flow cassette production because it delivers high consistency, tight dimensional control, and fast scalability. The process mass-produces complex housings with integrated wells, channels, and read windows without losing structural integrity. It reduces production time compared to manual assembly, supports snap-fit and hinge features, and scales quickly during public health emergencies. Automation makes it possible to run millions of identical cassettes with repeatable quality.
Dive Deeper
The core reason injection molding works so well here is repeatability. A lateral flow strip needs a fixed channel width, a controlled read window, and a stable sample well. If the housing changes even slightly, the wicking path changes, and your test result changes with it.
I worked on a rapid antigen cassette during a high-demand period. The customer needed millions of parts, fast. Manual assembly was never an option. We used a multi-cavity mold with automation to reach the volumes they needed. That is the power of this process. You get scalability without sacrificing quality.
Injection molding also lets you build complex features in one shot:
- Integrated strip channels
- Sample wells
- Clear read windows
- Living hinges
- Snap-fit closures
Here is a quick comparison of manufacturing methods:
| Method | Consistency | Speed | Cost at Scale | Tolerance Control |
|---|---|---|---|---|
| Manual Assembly | Low | Slow | High | Poor |
| 3D Printing | Medium | Medium | High | Medium |
| Injection Molding | High | Fast | Low | Excellent |
For any serious diagnostic product, injection molding wins at scale. It also supports design optimization to reduce material waste, which helps sustainability goals. And you can add anti-counterfeiting features like unique textures or identifiers directly into the mold.
My advice: do not treat the cassette as an afterthought. Design it in parallel with the assay. The housing is part of the assay system, not just a box around it.
How Should You Design a Lateral Flow Cassette for Molding?
Bad design causes leaks. It causes fit problems. It causes parasitic flow that ruins test accuracy. Many teams design the assay first, then force a housing around it later. That approach leads to expensive tooling changes and delays.
Featured Answer
You should design a lateral flow cassette by starting with accurate strip measurements, then modeling the housing around the strip, sample well, read window, and wicking path. Keep critical dimensions tight, especially around the strip channel and snap-fits. Design for clean assembly using snap-fit or ultrasonic welding. Plan for dye-flow testing to confirm the housing does not create parasitic flow. Use insert-based tooling so you can adjust windows and wells during development without building a new mold.
Dive Deeper
Good cassette design always starts with the strip, not the housing. I measure the strip first, including thickness tolerance, then build the channel around it with the right amount of compression. Too tight, and you crush the wicking path. Too loose, and the strip shifts or the sample bypasses the pad.
Here are the critical design targets I focus on:
- Strip channel: must locate the strip precisely without crushing it
- Sample well: must guide fluid to the pad, not around it
- Read window: must be clear, flat, and free of flow lines
- Snap-fits: must close cleanly without stress marks
- Wicking path: must stay controlled so no parasitic flow forms
A common mistake I see is ignoring draft angles and wall thickness. Thin walls warp. Uneven walls sink. Both problems shift your critical dimensions. Keep walls uniform and add draft everywhere the design allows.
Assembly method matters too. Here is how I choose:
| Assembly Method | Best For | Notes |
|---|---|---|
| Snap-fit | Low cost, fast assembly | Needs precise features |
| Ultrasonic welding | Sealed, leak-proof housings | Adds process step |
| Living hinge | One-piece cassettes | Requires PP for fatigue life |
For DFM, I always recommend a full review before cutting steel. Check draft, gate location, weld lines near the read window, and ejector placement. A gate placed near the window can leave a mark that blocks reading. Small details like this decide whether your cassette works.
My rule: freeze the assay dimensions first, then freeze the housing. Never the other way around.
Which Materials Work Best for Molded Cassettes?
Choosing the wrong material causes chemical attack, warping, or poor optical clarity. Diagnostic fluids can react with plastics. If your read window fogs or your housing swells, the test fails. Material choice is a real engineering decision, not a default.
Featured Answer
The best materials for molded lateral flow cassettes are polypropylene, polystyrene, and ABS. Polypropylene offers strong chemical resistance and works well for living hinges. Polystyrene provides good clarity for read windows and molds easily. ABS is a strong, dimensionally stable workhorse for housings. Material choice depends on chemical resistance, optical clarity, and assembly method. For sustainability goals, some programs test biodegradable or plant-based injection-moldable materials, though these need careful validation.
Dive Deeper
Material selection sets the limits of your cassette performance. I match the material to the chemistry of the assay and the function of each part.
Here is how I compare the common choices:
| Material | Chemical Resistance | Clarity | Hinge Ability | Cost | Best Use |
|---|---|---|---|---|---|
| Polypropylene (PP) | Excellent | Fair | Excellent | Low | Living-hinge cassettes, chemical exposure |
| Polystyrene (PS) | Fair | Excellent | Poor | Low | Clear read windows |
| ABS | Good | Fair | Poor | Medium | Rigid, stable housings |
Polypropylene is my go-to when the cassette needs a living hinge or faces aggressive buffers. It flexes millions of cycles without cracking. The trade-off is lower clarity, so I sometimes use a separate clear window or switch materials for the read area.
Polystyrene gives the clearest windows. If reading clarity matters most, PS shines. But PS is brittle and less chemical resistant, so I watch buffer compatibility closely.
ABS is the workhorse. It is strong, stable, and easy to mold. I use it when I need rigid, precise housings and clarity is handled elsewhere.
A few practical warnings from my experience:
- Always run a chemical compatibility check with the actual assay buffer, not a generic reference
- Confirm optical clarity on real molded parts, not just data sheets
- If biocompatibility applies to your device class, verify it early
- For sustainable programs, validate biodegradable materials fully before committing tooling
Never assume a material works because it worked on another product. Every assay chemistry is different. Test on real parts.
How Should You Approach Tooling and Quality Control?
Tooling mistakes are expensive. A wrong steel choice or fixed mold design can trap you when the assay changes. And without proper quality checks, defective cassettes reach production and cause failed tests in the field.
Featured Answer
Approach tooling by using insert-based molds during development so you can change windows, wells, or features without building a new mold. Use P20 steel or aluminum for R&D tools and hardened steel with higher cavitation for production. Run Moldflow, cavity balance, and gate-seal studies to improve consistency. For quality control, use dimensional inspection, visual flash control, and dye-flow testing to confirm the cassette does not create parasitic flow.
Dive Deeper
Tooling strategy makes or breaks a cassette program. During development, cassette and strip dimensions almost always change. If your mold is one solid block, every change means new steel and lost weeks. That is why I build development molds with interchangeable inserts and sub-inserts.
Here is how I stage tooling:
| Stage | Tool Type | Cavitation | Purpose |
|---|---|---|---|
| R&D | Aluminum / P20 with inserts | Low (1–2) | Fast iteration |
| Pilot | P20, more cavities | Medium | Validation builds |
| Production | Hardened steel | High | Mass production |
With inserts, I can swap the read window or adjust the sample well in days, not weeks. This saves both cost and schedule during the phase when changes happen most.
Before cutting steel, I run engineering studies:
- Moldflow analysis to predict fill and weld lines
- Cavity balance so every cavity fills the same
- Gate-seal time study for consistent part weight
- Cooling analysis to control warp
Warp is the enemy of tight tolerances. A warped cassette shifts the strip channel and read window. Cooling design controls this directly.
For quality control, I build a layered inspection plan:
- Dimensional inspection on critical features
- Visual flash control around windows and wells
- Dye-flow testing to catch parasitic flow paths
- Traceability on each lot for defect tracking
Dye-flow testing is the check people forget. It proves the housing does not create leaks or unwanted flow around the strip. I insist on it for every new cassette design.
When you choose a supplier, ask about their insert-tooling capability, Moldflow experience, and cleanroom molding options if your device needs it. A partner who understands assay-driven design will save you far more than a low quote ever will.
Conclusion
Injection molding gives lateral flow cassettes the consistency, speed, and precision that manual methods cannot match. The winning formula is simple: measure the strip first, design the housing around it, use insert-based tooling for fast changes, choose materials by chemistry and clarity, and test flow with dye. Freeze your assay dimensions before your housing. Do these things early, and you avoid the costly rework that delays most cassette programs.