
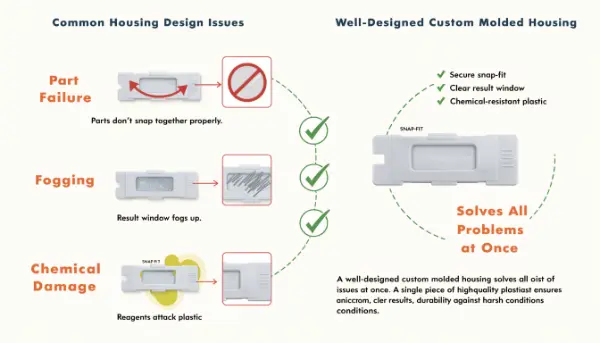
You designed a great rapid diagnostic test, but the housing keeps failing. Parts don’t snap together. The result window fogs up. Reagents attack the plastic. These problems delay your launch and hurt user trust. I have seen this many times. The good news is that a well-designed custom molded housing solves all of these issues at once.
Featured Answer
Custom molded housings for rapid diagnostic test kits are usually injection-molded plastic cassettes, sample enclosures, or reader guides built for tight fit, repeatability, and clean assembly. Good housings protect the test strip, align sample and reagent flow, provide a clear result window, and support tamper-evident features. To get them right, you must specify material, wall thickness, tolerance targets, assembly method, and any chemical or sterilization compatibility. This works best for lateral flow, PCR cartridges, and point-of-care testing (POCT) formats.
I have spent years molding these small parts, and I can tell you the details matter more than most people expect. Let me walk you through what really drives a successful housing.
Why Do Custom Molded Housings Improve Test Kit Protection and Stability?
Your test kit travels a long way. It sits in hot trucks, cold warehouses, and rough shipping boxes. A weak housing lets moisture in or lets the strip shift. Then the test fails at the worst moment. A custom housing protects the sensitive parts and keeps everything stable.
Quick Answer
Custom molded housings improve protection by sealing the test strip inside a rigid enclosure. Injection-molded plastic resists shock, blocks moisture, and holds the strip in a fixed position. Proper wall thickness and snap-fit seams prevent the housing from opening during transport. This keeps the diagnostic result reliable from the factory to the patient.
Dive Deeper
The housing is the first line of defense for your test. I once worked with a lateral flow customer whose strips kept drifting inside the cassette. The result line appeared in the wrong window position. The problem was not the chemistry. It was a housing with too much internal clearance.
Good protection starts with the internal ribs and locators. These small features hold the strip in place. They stop movement during a 1.5 meter drop. I always add a molded seat that matches the strip width within tight limits.
Wall thickness controls both strength and molding quality. For most diagnostic cassettes, I recommend a uniform wall between 1.0 mm and 2.0 mm.
| Wall Thickness | Result | Best Use |
|---|---|---|
| Below 0.8 mm | Warping, weak snap-fits | Avoid |
| 1.0–1.5 mm | Strong, easy to fill | Lateral flow cassettes |
| 1.5–2.0 mm | Very rigid | PCR cartridges, reader enclosures |
| Above 2.5 mm | Sink marks, long cycle | Avoid unless structural |
Uniform walls also prevent sink marks and internal stress. Uneven walls cause the part to cool at different rates. Then it warps. A warped housing will not close properly.
Moisture control is another key point. Many rapid tests include a desiccant. The housing must seal well enough to protect the desiccant chamber. I use tongue-and-groove seams for this. A simple flat seam leaks.
My best practice checklist for protection:
- Design a strip seat with locators
- Keep wall thickness uniform
- Use tongue-and-groove or snap-fit seams
- Add a desiccant pocket if needed
- Test with real drop and vibration cycles
Do not wait until production to test durability. Run drop tests on your first prototypes. This saves you from costly tooling changes later.
How Does Housing Design Support Ease of Use and Result Visualization?
A confusing housing frustrates the user. If the sample port is hard to find, people apply the sample wrong. If the result window is unclear, they misread the result. In medical testing, this is dangerous. Smart design fixes these problems before they reach the patient.
Quick Answer
Housing design supports ease of use through clear sample ports, guided reagent wells, and molded windows for result reading. A custom molded window made from clear polymer gives a sharp view of the test line. Reader guides and alignment features help automated devices read the result correctly. Good design reduces user error and increases confidence in the result.
Dive Deeper
Result visualization is often the hardest part to get right. A clear window sounds simple, but the plastic matters a lot. Many customers ask me why their result line looks cloudy. The answer is usually the wrong material or a poor surface finish.
For clear windows, I recommend these materials:
| Material | Clarity | Chemical Resistance | Notes |
|---|---|---|---|
| PC (Polycarbonate) | Very high | Moderate | Strong, impact resistant |
| PMMA (Acrylic) | Highest | Low | Scratches easily |
| SAN | High | Good | Good for windows |
| ABS (clear grade) | Medium | Good | Common, low cost |
The mold surface finish controls how clear the window looks. For a bright, glass-like window, I polish the mold cavity to a high optical finish. A rough finish scatters light and makes the result hard to read.
For point-of-care testing with a reader machine, alignment is critical. The reader must sit in the exact same position every time. I add molded guide rails and a locating notch. These features keep variation low. Low variation means the reader gets a repeatable image.
Ease of use also comes from the sample port design. I like to add a funnel shape at the sample well. This guides the drop into the right place. It reduces spills and wrong applications.
Color-coding is another practical feature. Many of my customers run several test types. They use different housing colors to avoid mix-ups. Blue for one target, green for another. This simple step prevents serious errors in busy labels and clinics.
My design recommendations for usability:
- Use PC or SAN for clear windows
- Polish the window area to optical finish
- Add reader guide rails for POCT devices
- Design a funnel-shaped sample port
- Use color-coding to separate test types
- Mold text or icons directly into the part
Molded-in labels are more durable than printed stickers. They will not peel off in humid storage.
What Materials and Features Matter for Contamination, Chemistry, and Security?
Your reagents can attack the wrong plastic. Contamination can ruin results. And fake or tampered kits destroy trust in your brand. These risks are real. The right material choice and smart features protect both the test and your reputation.
Quick Answer
Material choice controls chemical resistance and reagent compatibility. Polypropylene (PP) and cyclic olefin copolymer (COC) resist most diagnostic reagents. Smooth, non-porous surfaces reduce contamination and support hygiene. Tamper-evident features, like break-away tabs and one-way snap-fits, increase product security and user confidence. For regulated diagnostics, material selection must also consider biocompatibility and any sterilization needs.
Dive Deeper
Chemistry is where many projects fail. A reagent that works fine in a glass tube may crack the plastic housing over time. This is called environmental stress cracking. I always ask customers for their reagent list early. Then I match the material.
Here is a simple material guide I use for diagnostic housings:
| Material | Chemical Resistance | Clarity | Cost | Best For |
|---|---|---|---|---|
| PP | Excellent | Low | Low | Reagent contact parts |
| COC | Excellent | High | High | Microfluidic cartridges |
| ABS | Good | Medium | Low | Outer housings |
| PC | Moderate | High | Medium | Windows, structural |
| PETG | Good | High | Medium | Clear enclosures |
For parts that touch reagents, I lean toward PP or COC. They handle alcohols, buffers, and mild acids well. For outer housings that never touch fluid, ABS is a cheap and solid choice.
Contamination control is about surface quality. A rough or porous surface traps particles. I keep reagent-contact surfaces smooth and free of sharp corners. Sharp corners collect fluid and dry into residue. Rounded internal features clean better and flow better.
Cleanroom molding matters here too. For diagnostic parts, I recommend molding in a controlled environment. An ISO Class 7 or Class 8 cleanroom keeps airborne particles off the parts. This supports hygiene and helps meet ISO 13485 quality expectations.
Tamper-evident features protect your brand. I design break-away tabs that snap when the kit is opened. Once broken, they cannot go back. The user sees clearly if the kit was already used. One-way snap-fits work the same way. They lock shut and resist reopening.
Best practices for material and security:
- Match material to your reagent list
- Use PP or COC for reagent contact
- Keep contact surfaces smooth and rounded
- Mold in a cleanroom for hygiene
- Add break-away tamper tabs
- Consider biocompatibility for skin or sample contact
Always run a chemical compatibility test on real molded parts. Data sheets give a starting point, but real parts under real reagents tell the truth.
How Do You Reduce Lead Time and Plan for Future Test Platforms?
You are under pressure to launch fast. But rushing tooling causes mistakes. And a housing that only fits one test locks you into a single product. You need speed today and flexibility tomorrow. Good planning gives you both.
Quick Answer
Reduce lead time with prototype-to-production tooling, DFM review, and mold flow analysis before cutting steel. Bridge tooling supports early market entry while production molds finish. For future growth, use modular housing designs. A modular base with interchangeable inserts lets one platform support multiple test types, which lowers cost and speeds up new product launches.
Dive Deeper
Speed and planning go hand in hand. I have seen teams rush a mold, skip the DFM review, and then wait weeks for repairs. The rush actually made them slower. A proper DFM review at the start saves far more time than it costs.
Mold flow analysis is my favorite tool for thin diagnostic parts. It shows where the plastic will fill, where it might trap air, and where it could warp. For a thin cassette, this is essential. I once caught a short-shot problem in simulation and moved the gate. That single change saved a full tooling revision.
Here is how I compare tooling paths for a fast launch:
| Tooling Type | Lead Time | Volume | Cost | Best Use |
|---|---|---|---|---|
| 3D printed prototype | Days | Under 100 | Low | Early fit checks |
| Bridge/soft tool | 2–4 weeks | Thousands | Medium | Early market launch |
| Production steel mold | 6–12 weeks | Millions | High | Full production |
A common strategy is to start with a bridge tool. This gets kits into the field while the production mold is built. It lowers risk and keeps momentum.
Modular design is where smart teams win long term. Instead of a fully custom housing for every test, design a common base. Then use different inserts or windows for each test type. One customer of mine built a single cassette base. They ran lateral flow and molecular tests using different internal inserts. They saved money and launched new tests in weeks, not months.
My checklist for speed and flexibility:
- Run DFM before cutting steel
- Use mold flow analysis on thin parts
- Start with bridge tooling if needed
- Design a modular base platform
- Standardize outer dimensions across tests
- Keep quality-system documentation ready
Also think about sustainability. More recycled and bio-based grades are now available. Some meet the strength and clarity you need. If environmental goals matter to your company, ask your supplier for compliant options early.
When you pick a supplier, look for real diagnostic experience. Ask to see their cleanroom, their tooling shop, and their validation support. A partner who understands both molding and medical requirements will save you many headaches.
Conclusion
Custom molded housings decide whether your diagnostic test succeeds or fails in the field. Focus on protection, clear result windows, reagent-safe materials, and tamper-evident security. Plan tooling early with DFM and mold flow analysis. Use modular designs to grow your platform. My advice: test real molded parts with real reagents before you commit to production. Details in the housing protect both your result and your users.