
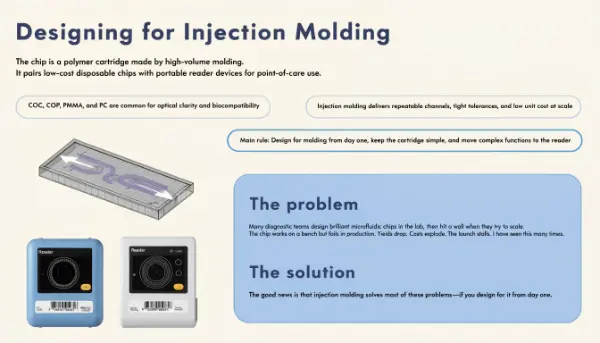
Many diagnostic teams design brilliant microfluidic chips in the lab, then hit a wall when they try to scale. The chip works on a bench but fails in production. Yields drop. Costs explode. The launch stalls. I have seen this many times. The good news is that injection molding solves most of these problems—if you design for it from day one.
Injection molded microfluidic chips are polymer cartridges made by high-volume molding to run diagnostic tests outside a central lab. They pair low-cost disposable chips with portable reader devices for point-of-care use. Common materials include COC, COP, PMMA, and PC because they offer optical clarity and biocompatibility. Injection molding delivers repeatable channels, tight tolerances, and low unit cost at scale. The main rule is simple: design the chip for molding from the start, keep the cartridge simple, and move complex functions to the reader.
Most microfluidic projects fail not because the science is weak, but because the chip cannot be made reliably. Let me show you what really matters.
What Are Microfluidic Devices for Point of Care Diagnostics?
You need fast results near the patient, not days of waiting for a central lab. But building a device that is both accurate and mass-producible feels impossible. Microfluidic point-of-care devices bridge this gap by moving lab functions onto a small polymer chip.
A microfluidic device for point-of-care diagnostics is a small cartridge that moves and controls tiny fluid volumes through micro-channels to run a medical test at or near the patient. It works with a portable reader that handles detection, heating, or optics. The chip is usually disposable and injection molded from polymers like COC or PMMA. This design brings lab-grade testing to clinics, homes, and remote areas without large equipment or trained lab staff.
Dive Deeper
I have worked on several point-of-care cartridge projects, and the pattern is always the same. The teams that succeed treat the reader and the chip as one system. They do not try to put everything on the chip.
A point-of-care microfluidic device has three main parts:
| Component | Function | Where Complexity Lives |
|---|---|---|
| Disposable chip | Fluid handling, sample prep, reaction | Kept simple, low cost |
| Reader/instrument | Detection, optics, heating, control | Handles the hard work |
| Assay chemistry | Reagents, coatings, biology | Tuned for the target |
The chip is the part we injection mold. It contains micro-channels, chambers, and sometimes valves. The reader is reusable. This split matters because a simple chip means simpler tooling, higher yields, and lower cost per test.
From an engineering view, the chip must do three things well. First, it must move fluid in a controlled way. Second, it must survive shipping and storage. Third, it must give the same result every time. Injection molding supports all three when the design respects the process.
Common mistakes I see:
- Trying to integrate too many functions on one chip
- Ignoring draft angles and demolding early in design
- Choosing a material before knowing the optical needs
- Skipping mold flow analysis for micro-features
My advice: define the clinical decision first. If the test needs only a clear yes/no or a simple category, you can keep the chip simple. That single choice often decides whether the product ever reaches the market.
What Are Microfluidic Chips Primarily Used For?
R&D teams often build complex chips without knowing the real target application. This wastes tooling money and delays launch. Understanding the main uses helps you design the right chip the first time.
Microfluidic chips are primarily used for medical diagnostics, including blood tests, infectious disease detection, molecular assays like PCR, and immunoassays. They also serve in cell analysis, drug screening, and environmental testing. In point-of-care diagnostics, the most common use is rapid detection of a specific disease marker using a small sample of blood, saliva, or nasal fluid. The chip controls the sample flow so the reader can measure the result quickly and reliably.
Dive Deeper
In my experience, the strongest microfluidic products focus on one clear job. When a customer says "we want a chip that does everything," I know the project is at risk. Focus wins.
Here are the main application areas and how they shape chip design:
| Application | Typical Assay | Chip Design Impact |
|---|---|---|
| Infectious disease | PCR, lateral flow, immunoassay | Needs heating zones, sealed chambers |
| Blood chemistry | Enzymatic, colorimetric | Needs clear optical windows |
| Molecular testing | Nucleic acid amplification | Needs precise volume control, low leachables |
| Cell analysis | Sorting, counting | Needs tight channel tolerances |
Each application drives different design choices. A PCR chip needs good thermal control, so wall thickness and material heat resistance matter. An optical immunoassay needs a clear, low-autofluorescence window, so material selection and surface finish matter more.
When I plan a mold for a diagnostic chip, I ask these questions early:
- What is the smallest channel feature?
- What is the tightest tolerance?
- Where does light enter and exit?
- What reagents touch the polymer?
The answers shape the DFM review. For example, if the channels are very small, I check the aspect ratio. Deep, narrow channels are hard to fill and hard to demold. I often suggest a slightly wider channel with a shallower depth to improve molding yield without hurting the assay.
The lesson is simple. The application defines the chip, and the chip defines the mold. Get this order right, and production becomes much easier.
What Are Microfluidic Chips?
Engineers new to microfluidics often confuse them with normal molded parts. But micro-features behave differently. Filling, cooling, and demolding all change at this scale, and small mistakes cause big failures.
Microfluidic chips are small polymer or glass devices with tiny channels, chambers, and features that control very small fluid volumes, often in microliters or nanoliters. The channels guide, mix, split, or react fluids in a precise way. Most modern diagnostic chips are made from thermoplastics like COC, COP, PMMA, PC, or PP using injection molding. A cover layer is bonded on top to seal the channels. The result is a compact, disposable test platform for medical and lab use.
Dive Deeper
A microfluidic chip looks simple, but the manufacturing is not. The channels are often smaller than a human hair. At this scale, plastic behaves in ways that surprise many engineers.
Let me explain the key physical challenges:
- Filling. Molten polymer must fill tiny channels before it cools. If the flow front cools too fast, features do not form. Mold flow analysis helps predict this.
- Cooling and warpage. Thin sections cool fast. Uneven cooling causes warpage, which breaks the seal during bonding.
- Demolding. Micro-features can stick to the mold. Draft angles and mold surface finish decide whether the part releases cleanly.
Material selection is critical. Here is how the common choices compare:
| Material | Optical Clarity | Bonding Ease | Cost | Best Use |
|---|---|---|---|---|
| COC | Excellent | Good | Medium | Optical assays |
| COP | Excellent | Good | Medium | Molecular tests |
| PMMA | Good | Easy | Low | General diagnostics |
| PC | Good | Moderate | Low | Rugged cartridges |
| PP | Fair | Harder | Very low | Simple fluidics |
After molding comes bonding. This step seals the channels with a cover film or layer. Bonding methods each have tradeoffs:
- Thermal bonding: Strong, but risks deforming channels.
- Solvent bonding: Good seal, but may add leachables.
- Adhesive bonding: Flexible, but glue can enter channels.
- Plasma or UV bonding: Clean and automatable, but needs equipment.
I once worked on a chip where the customer chose thermal bonding without testing it. The heat closed several micro-channels. We switched to a controlled adhesive process and saved the project. This is why I always validate bonding early, not late.
The takeaway: a microfluidic chip is a precision system, and every step from molding to bonding must be designed together.
What Are the Advantages of Microfluidic Chips?
Sourcing managers often ask why they should invest in molded microfluidic chips instead of older test formats. The cost and complexity look scary at first. But the long-term advantages are strong when the design is right.
Microfluidic chips offer several advantages: they use very small sample and reagent volumes, deliver fast results, and lower cost per test at high volume. Injection molding adds repeatable quality, tight tolerances, and true mass production. The chips are compact and portable, which supports decentralized testing. They can integrate multiple steps like mixing, separation, and detection in one small device. Combined with a reader, they bring reliable lab-grade results closer to the patient.
Dive Deeper
The advantages of microfluidic chips become real only when they are made well. In my work, the difference between a good chip and a great chip is manufacturability.
Here are the main advantages, with the engineering reason behind each:
| Advantage | Why It Matters | Manufacturing Driver |
|---|---|---|
| Low sample volume | Less blood or reagent needed | Precise micro-channels |
| Fast results | Better patient care | Short flow paths |
| Low cost at scale | Affordable testing | Injection molding volume |
| Portability | Testing anywhere | Compact molded design |
| Consistency | Reliable clinical results | Repeatable tooling |
Injection molding is the key enabler here. Once the mold is built and validated, each chip is nearly identical. This repeatability is essential for medical devices, where every test must give the same trusted result. Under ISO 13485 and good manufacturing practice, this consistency also supports traceability and validation.
But there are tradeoffs. Let me be honest about them:
Advantages:
- Very low unit cost at high volume
- Excellent reproducibility
- Scalable to global demand
- Supports cleanroom production for medical use
Disadvantages:
- High upfront tooling cost
- Long tool lead time
- Design changes are expensive after the mold is cut
- Micro-features demand skilled mold making
My practical advice for teams:
- Prototype in a soft or low-volume method first to prove the assay.
- Freeze the design before cutting a production mold.
- Run mold flow analysis on micro-features early.
- Validate bonding and surface treatment before scaling.
- Choose a supplier with real cleanroom and medical molding experience.
Surface modification is another advantage worth using. Coatings can improve fluid flow and boost assay sensitivity. But coatings add cost and validation work, so use them only when the assay truly needs them.
The biggest advantage is scalability. When global demand rises, automated injection molding can meet it. This is why I always tell diagnostic teams: if you plan for volume, plan for molding from the beginning.
Conclusion
Injection molded microfluidic chips are a proven path to affordable, high-volume point-of-care diagnostics. The materials, tooling, and processes are ready. The real risk is design. Keep the chip simple, move complexity to the reader, and validate molding and bonding early. Design for manufacturability from day one, not as an afterthought. That single mindset decides whether your microfluidic idea reaches patients or stays stuck in the lab.