
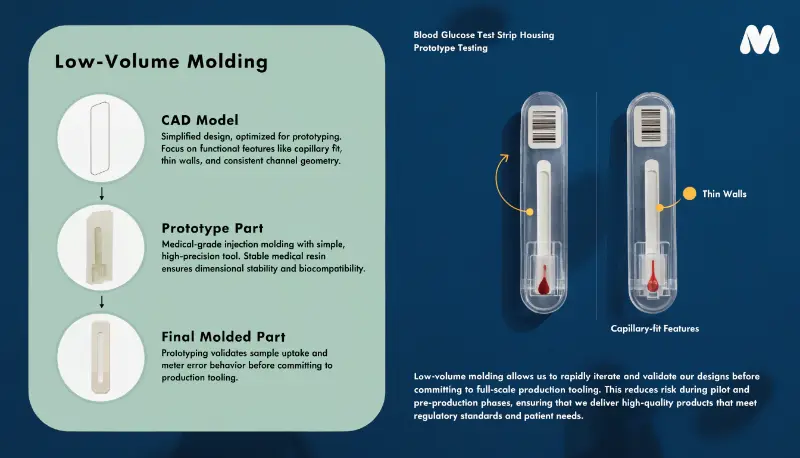
You need blood glucose test strip housings for a clinical trial or early launch, but committing to expensive production tooling feels risky when your design may still change. One late revision can waste months and thousands of dollars. This is a real fear I hear from diagnostic engineers every week. Low volume molding solves this by giving you precise, biocompatible parts without locking in your design too early.
Low volume molding for blood glucose test strip housings works best with medical-grade injection molding using a simple, high-precision tool and a resin chosen for dimensional stability and biocompatibility. The key is controlling capillary-fit features, thin walls, and consistent channel geometry so the strip fills correctly and the meter detects an adequate sample. Start with a prototype mold plus a stable medical resin, then validate sample uptake and meter error behavior before investing in production tooling. This approach reduces risk during pilot and pre-production phases.
Most engineers focus on tooling cost first. In diagnostics, that is the wrong starting point. Let me show you what really matters, and where I have seen projects succeed or fail.
What Is the Minimum Quantity for Injection Molding in Medical Applications?
You may wonder if injection molding makes sense for only a few hundred parts. Many engineers assume molding only pays off at high volume. For medical devices, that assumption can cost you accuracy and time. Low volume molding fills this exact gap.
There is no fixed minimum quantity for injection molding. In practice, medical low volume molding runs from a few hundred to a few thousand parts using prototype or aluminum tooling. This range fits clinical trials, pilot builds, and early launches. Single-cavity tools handle small batches well while keeping part repeatability high. The real driver is not quantity alone but design stability, tolerance needs, and how soon you expect changes based on clinical feedback.
Dive Deeper
I have run many programs where the customer only needed 500 to 2,000 housings for a trial. Injection molding still made sense because the part geometry needed to match final production. If your housing affects strip fluid path, you cannot afford loose prototype methods. The parts must behave like the real thing.
Here is how I think about volume and tooling choices:
| Volume Range | Recommended Tooling | Best Use Case |
|---|---|---|
| 100–1,000 | Single-cavity aluminum | Early pilot, design still changing |
| 1,000–10,000 | Soft steel prototype tool | Pre-production, near-final design |
| 10,000+ | Multi-cavity hardened tool | Stable design, mass production |
Aluminum tools cost less and cut faster. They wear out sooner, but for a few thousand shots they work fine. Soft steel lasts longer and holds tighter tolerances. I usually recommend aluminum when a design revision is likely within six months.
Common mistakes I see:
- Jumping to multi-cavity tooling before validating the design.
- Choosing a resin that molds well but is not biocompatible.
- Ignoring shrinkage effects on capillary features.
Best practices for low volume medical molding:
- Keep wall thickness uniform to reduce warping.
- Minimize undercuts to simplify the tool.
- Validate dimensions on the first shots before scaling.
- Match prototype resin to production resin whenever possible.
The goal is not the cheapest tool. The goal is a part that performs the same in the trial and in production. That protects your regulatory data and your timeline.
How Are Glucose Test Strips Made and Where Does the Housing Fit?
Engineers new to diagnostics often underestimate how sensitive strip production is. A tiny geometry error can flag a wrong reading. That risk grows if the housing interferes with the fluid path. Understanding the full process helps you design better housings.
Glucose test strips are made by layering electrodes, reagents, and hydrophilic materials onto a base substrate, then covering them to form a controlled capillary channel. The blood sample enters through a small opening, fills the channel by capillary action, and reacts with the reagent so the meter reads glucose levels. The housing or carrier protects these layers and helps guide the fluid path. Molding, die cutting, and laser drilling create the fine features that manage capillary flow and sample uptake.
Dive Deeper
When I first worked on a strip carrier, I assumed the housing was just a simple protective shell. I was wrong. The housing shape affected how the sample entered the channel. Small flash on the molded edge changed the capillary fill. That taught me how tightly design and function connect in diagnostics.
The typical strip build looks like this:
- Base substrate: carries the electrodes.
- Reagent layer: reacts with glucose.
- Spacer layer: forms the channel height.
- Cover with vent: lets air escape as blood enters.
- Housing or carrier: protects and positions the strip.
Air gaps, hydrophilic surfaces, and controlled fluid paths matter most. If the meter senses insufficient sample, it flags an error. So your molded features must not block or slow the fluid.
Design considerations for the housing:
| Factor | Why It Matters |
|---|---|
| Wall thickness | Affects molding stability and moisture protection |
| Surface finish | Impacts sensor layer adhesion |
| Moisture barrier | Prevents reagent degradation |
| Channel alignment | Ensures correct capillary fill |
Moisture is a hidden enemy. Reagents degrade fast in humidity. Your molded housing should support a tight moisture barrier, sometimes with post-molding surface treatments to improve adhesion of sensor layers.
Practical advice: if the housing is only protective and does not touch the fluid path, your tolerance burden drops. A simpler low-cavity tool works. But if it guides the sample, treat every feature as critical and validate carefully. Never assume the housing is "just plastic."
How Thin Can You Injection Mold for Test Strip Housings?
Thin walls save material and reduce cycle time, but push too far and you get short shots or warping. For strip housings, thin sections often meet fine capillary features. This is where many low volume programs struggle. Getting wall thickness right early saves painful rework.
Standard injection molding handles walls from about 0.5 mm to 4 mm. For medical strip housings, most designers stay between 0.8 mm and 2 mm for reliable filling. Very thin walls below 0.5 mm are possible with the right resin, high injection pressure, and careful gate placement, but they raise risk. Uniform thickness matters more than thinness alone. Sudden changes in wall thickness cause warping, sink marks, and inconsistent capillary geometry that can affect strip performance.
Dive Deeper
Thin wall molding sounds simple until you try it. I once had a housing with a 0.6 mm section next to a 2 mm boss. The thin area filled last and warped every time. We fixed it by balancing the flow and adjusting the gate. Uniform thickness is the real secret, not just going thin.
Here is a practical guide for wall thickness by resin type:
| Resin | Typical Wall Range | Notes |
|---|---|---|
| Polypropylene (PP) | 0.8–3.0 mm | Flows well, good for thin walls |
| Polycarbonate (PC) | 1.0–3.5 mm | Strong, needs higher pressure |
| ABS | 1.2–3.5 mm | Easy to mold, good finish |
| Acrylic (PMMA) | 1.0–3.0 mm | Clear, brittle if too thin |
Key factors for thin wall success:
- Gate location: place it to fill thin sections first.
- Injection speed: faster fill prevents freezing.
- Melt flow index: higher flow resins fill thin walls better.
- Venting: thin walls trap air, so vent well.
Common mistakes:
- Mixing thick and thin sections in one part.
- Using a stiff resin for very thin walls.
- Ignoring mold flow analysis before cutting steel.
I always run mold flow analysis on thin wall parts. It shows where the resin freezes and where air traps form. This step is cheap compared to recutting a tool. For a diagnostic housing, I also check how thin walls affect moisture protection. A wall too thin may not block humidity well.
Best practice: keep wall thickness within a 25% variation across the part. This keeps shrinkage even and protects your capillary geometry. Consistency beats thinness every time.
What Plastic Can Be Injection Moulded for Medical Strip Housings?
Choosing the wrong plastic is a costly mistake in diagnostics. Some resins mold beautifully but fail biocompatibility. Others resist moisture but crack under stress. For blood glucose housings, material choice affects accuracy, safety, and compliance. Picking the right medical-grade resin early prevents painful redesigns.
Many plastics can be injection moulded, but medical strip housings need medical-grade resins that meet biocompatibility and stability needs. Common choices include polypropylene (PP), polycarbonate (PC), ABS, and acrylic (PMMA). PP resists moisture and chemicals well. PC offers strength and clarity. The best material depends on moisture protection, dimensional stability, sensor adhesion, and regulatory requirements. Always confirm the resin has proper medical documentation and can survive your sterilization or storage conditions.
Dive Deeper
Material selection is where I spend the most time with customers. The plastic touches everything: molding, function, moisture protection, and compliance. For a glucose strip housing, I always start with the environment. Will it face humidity? Sterilization? Long shelf storage? These answers narrow the list fast.
Here is how I compare common medical resins:
| Resin | Moisture Resistance | Dimensional Stability | Sensor Adhesion | Cost |
|---|---|---|---|---|
| PP | Excellent | Good | Fair | Low |
| PC | Good | Excellent | Good | Medium |
| ABS | Fair | Good | Good | Low |
| PMMA | Fair | Good | Fair | Medium |
Polypropylene is my common first choice for housings that need strong moisture protection. It resists water and many chemicals. But it can be harder to bond sensor layers to, so post-molding surface treatment may help.
Polycarbonate wins when you need strength and tight tolerances. It holds dimensions well, which protects capillary geometry. It costs more and needs higher molding pressure.
Material selection checklist:
- Confirm biocompatibility documentation (USP Class VI or ISO 10993 support).
- Check moisture absorption rates.
- Verify dimensional stability over temperature.
- Test sensor layer adhesion on the chosen surface.
- Confirm resin availability for production scale-up.
A mistake I see often: engineers pick a resin for prototypes, then switch for production. The new resin shrinks differently and breaks the capillary fit. Always match your prototype and production resin, or at least validate the change.
For regulated diagnostic products, material choice and process validation matter as much as tooling cost. Document everything. Your quality and regulatory teams will need this data. A good supplier helps you gather it early, not at the end.
Conclusion
Low volume molding gives you a safe, precise path for blood glucose test strip housings during trials and early launch. Focus on design stability, uniform wall thickness, and a validated medical-grade resin before scaling. Start with a prototype mold, test sample uptake and meter behavior, then commit to production tooling once your design proves stable. The tooling cost matters less than protecting your accuracy and your timeline.